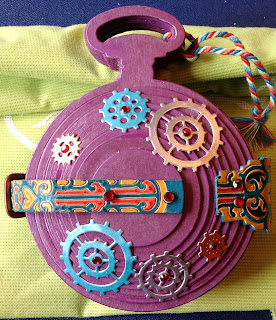
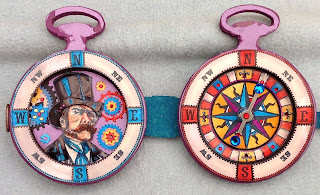
Hello, today I thought to show my Steam Punk floral compass, Its taken awhile as I do it in small steps. Any way here's some pictures I hope you like what you see.
Tools and Materials used.
Die cutting machine. Jus-Cutz.
Life style craft circle dies.
All occasion dies-cogs set, and various other cog dies.
Spellbinders crosses die set.
Sizzix pocket watch die, circles dies, Movers and Shapers Labels die, Bigz Daisy die.
Truecut roller cutter and ruler.
Crocodile hole punch.
Tim Holtz, long fasteners, buckles, distressed paint, Seedless Preserves, Black Soot. Distressed inks. Stampers Anonymous Time Traveller's stamp set.
Gunge board.
Pearlised card, various colours.
Clarity satin card.
Various gems.
Pro marker pens.
Glue.
Vegetable tanned leather.
Compass stamp {one of my own}.size diameter 4 inches.
Eyelets large and small.
Small piece of clear plastic.
Basic method of building the pocket watch is covered in Pocket watch number three. Look in July. The main difference in this Steam Punk compass was to create greater depth this was done by the use of grunge board instead of grunge paper, which is roughly twice as thick. You can see the difference this makes in the photo above as both are shown side by side.
The hinge and buckle tie are cut out of vegetable tanned leather using the Sizzix dies movers and shapers labels with their magnetic base tray and the Truecut wheel cutter with ruler. Both the hinge and the tie were both run through through my die cutting machine using the Spellbinders largest cross die. As the leather is so thick the die will just cut and emboss the smooth surface which can then be coloured with pro markers or other alcohol ink pens.
Next I glued together five completed circle layers and punched holes to add both hinge and buckle (I use a Crocodile hole punch).As you see below.
I cut out a small piece of the fourth circle to accommodate the hinge.
Once the hinge, buckle and strap were fixed in place with long fasteners, the rest of the layers were stuck together.
Next to decorate the inside, here I used Tim Holtz Time Traveller's stamps with various cogs and gems.

Here I made a small tube of card which I then glued and painted so that I could add a spinner for my compass. Using the tiny centre circle of the compass stamp I added a small eyelet then a larger eyelet so one sat inside the other I then attached the spinner first to a fastener and then through the eyelets. It was done this way so the spinner could move when glued to the top.
Next I cut the four layers of my compass stamp and coloured them with pro markers and distressed inks. The layers were then glued in place and the spinner attached.
Here are two pictures of the finished compass inside and out.
Country View crafts Challenge 7 for September :- LAYERS Heres the link.


No comments:
Post a Comment